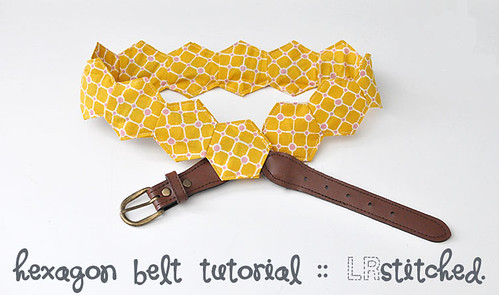
I’m excited to share this tutorial with you as a part of the Festival of Hexagons!
I love quirky clothing items and thought a hexagon belt would be a fun nod to quilters.
Let’s get started!

:: Supplies Needed ::
• A 1.5″ wide skinny belt (larger width would work too, but you’ll need to increase your hexagon size)
• 1.5″ hexagon templates (I printed mine here)
• 1/2 yard fabric cut into 3″ squares
• Needle and matching thread
• Sewing machine
• Spray starch and iron
• Scissors
• Safety pin
Begin by measuring the area you want your hexagons to cover and round up to an even number if needed.
You will need 1 hexagon for each inch and the number will be divided between the front and back of your belt.
Example: For my belt, the area I needed to cover was 26″. I needed 13 for the front and 13 for the back, 26 total.
Cut out as many 3″ squares as needed and using your 1.5″ template, baste your hexagons. Here is a great video tutorial if you’re new to basting hexies!

Divide your basted hexagons evenly into two stacks and stitch each stack together to make 2 rows. I chose to stitch by machine using an 1/8″ seam allowance.
Stitch by hand if you are more comfortable with that!
Starch and press each row well.
![]()
Lay one of your rows out onto your belt to make sure it evenly covers your desired space.
![]()
Now take both rows and place wrong sides together. Pin at each point making sure to line up the hexies evenly.
You will sew the top points and the bottom points separately, leaving the ends open.
![]()
Using an 1/8″ seam allowance, carefully sew around each point leaving the beginning and end of the row open. (You will insert your belt through this opening).
Be sure to backstitch at each starting and stopping point. Clip your threads.
![]()
Take your safety pin and and poke through an inconspicuous point on the buckle free end of your belt. Carefully thread through your hexagon casing.
![]()
Straighten out your hexies and press using a cloth between your belt and iron. The casing should fit snugly around your belt.
You can put a small hand stitch at the top and bottom corner of the hexagons at the beginning and end of your belt to prevent shifting, if needed.
Put on your new belt and strut your stuff!
![]()
![]()
I hope you enjoy!
Lindsey
Be sure to visit the rest of the stops on the hop this week, I can’t wait to see what the other ladies have in store.

Saturday, Aug. 25 – Recap
.jpg)


So clever! I think I’m going to make one of these for my daughter who likes using ribbon as a belt for her dresses!
This is a brilliant idea and it looks so good. You can have different colour hexie belt covers to swap around depending on the dress. Neat.
What a clever idea, just wish I still had a waist that I’d be happy to show off!
This is so cute!
Deborah
homemakerhoney@ gmail .com
How fun is this! Unfortunately I can’t wear belts.
Super cute Linds!
This is seriously so so so awesome! I’m heading to goodwill today to buy a skinny belt!
[…] Skip to content HomeAbout Me.Featured.Shop.Sponsor.Tutorials.Zakka Sew Along ← Tutorial :: Hexagon Belt August 20, 2012 · 9:02 am ↓ Jump to […]
What an awesome idea!!! I have the perfect belt to cover 🙂
Oh my gosh! What an awesome looking belt. Great job. LOVE IT!
Your post today was the first I’ve seen about this Festival of Hexagons. Looks like I have some catching up to do in checking out the other tutorials. I have always loved Hexies.
Thank you for the awesome tutorial and the info on the Festival too.
wow how cool this is going too try and make one and hang my love-ie sony headset part on it and walk away with colorfull hexie’s on my belt thanx too you Lindsey
[…] Over at Lindsey’s blob LRStitched she shared a great tutorial on how to upcycle a belt with hexagonss. […]
[…] Topped it off with my hexagon belt! […]
Hello, thanks i m very impressed with your work
I love the belt and dress. Did you make the dress?
thank you! I did not make the dress, it’s from Target from a few years ago.
With havin so much written content do you ever run into any issues of
plagorism or copyright violation? My website has a lot
of exclusive content I’ve either written myself or outsourced but it seems a
lot of it is popping it up all over the web without my
agreement. Do you know any ways to help stop content from being stolen?
I’d genuinely appreciate it.